Instrument Approaches: As Easy as 5 A's and T's
For seasoned and new IFR students alike, shooting approaches can sometimes feel like being drawn into a rapidly constricting vortex. The mental walls come closing in, your mind goes a mile a minute, and things don't always feel completely in your control. At those moments, you may ask yourself, "Is there any way I can get a better mental grip on all of this?" Yes, there is, and that's where the five A's and T's come into play.
.png?width=280&height=653&name=Copy%20of%20Untitled%20(300%20%C3%97%20700%20px).png)
%20(1).png?width=280&height=653&name=Untitled%20(300%20%C3%97%20700%20px)%20(1).png)
These preparation and situational awareness tools help you get things ready to shoot the approach and fly each leg of it with exacting precision. Use them regularly, and you will have that grip you need when the pace demands the most of your focus and abilities.
This article will address how you can better manage workload, maintain situational awareness, and reduce cockpit stress — no matter your current level of instrument flying. To do that, we will break down an approach into Austin-Bergstrom International (KAUS) in three phases.
- En route
- Entering the terminal area
- Shooting an approach with the missed
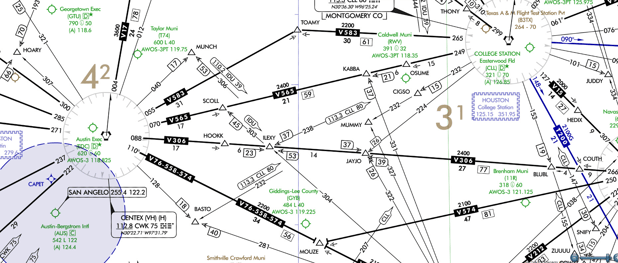
You will approach from the east at 6,000 feet, on V565, from College Station, Texas (KCLL). Your route will take you to the CWK VORTAC, and from there, you will receive vectors-to-final for the ILS RWY 18L.
(Click image to enlarge)
Using the Five A's
To prepare for shooting the approach, you will want to use the five A's 30 miles out from your destination. You can use the five A's in both steam gauge and glass cockpits. The order in which you do them matters because you will rapidly progress from one step to another, and performing the steps in a logical workload-managing flow is important.
First, obtain ATIS for all the obvious reasons, including runways and approaches in use, plus a few extras, like crosswinds and any lighting out of service that could raise your visibility minimums. Then, move on to altimeter. Dial this in precisely so that you are in sync with all your approach plate heights, particularly at the FAF, where you see your minimum altitude and the altitude you should be at following the glide slope.
Alignment is next. It may seem tailored more for steam gauges, but you can still use it to check your standby attitude indicator in a glass cockpit. You also want to check your heading indicator against your compass, and it's not a bad idea to double-check your digital readout against your compass so you don't let your guard down with all the technology at your fingertips. If, for some rare reason, they are not in sync, you certainly want to know.
Approach involves your usual approach briefing, which you should have reviewed in depth on the ground before you took off. Every bit of ink is there for a reason, so be sure to look at all of it before getting into the cockpit. In the scenario, this phase of the briefing is for ILS RWY 18L (including the title of the approach because you wouldn't want to set up accidentally for ILS RWY 18R, would you?).
We will return to the frequencies in a moment, but for now, you want to look at the plan view (overhead) to see where you will go and the profile view for the course, fixes, and altitudes that will take you to the runway. This step also marks where you should use the five T's every time you cross a fix. For now, you want to know what you will need to do at the FAF: how far (distance to MAP), how long (when it's a timed approach), and how low (MDA or DA).
Lastly, proceed to your avionics. This step is where order and flow really matter. Since avionics stacks will vary, these suggestions are meant to be generic. Starting at the top of the stack, from left to right, perform the following steps.
- Marker beacon test and sensitivity level (low will keep it from triggering too soon)
- Comm 1 volume level and frequencies (Approach 127.22 or as assigned, Tower 121.00)
- Nav 1 volume, ID'ing the active frequency (Localizer 110.50, then CWK 112.80 for later when doing the missed hold)
- GPS or VOR mode (absolutely critical)
- Comm 2 volume level and frequencies (ATIS 124.40, Ground 121.90)
- Nav 2 volume, ID'ing the active frequency (CWK 112.80, and CWK 112.80 for redundancy), the DME (if you have one) frequency (I-VNK, 110.50), and the transponder code (double-check ALT mode is on).
Now we go to the programable and adjustable instruments, starting with your GPS. Load the KAUS ILS RWY 18L and choose DOFFS as your IAF.
Note: ATC will likely give you vectors-to-final, but you can always use the Activate Leg function to modify the approach once you get closer. You don't want to eliminate the DOFFS from your initial setup because you'll want to know where you are in relation to SCALI. If you activate vectors-to-final, DOFFS and SCALI won't be visible in FPL.
Ensure that GPS mode is selected for now; you'll pay close attention to whether it's switched to VLOC mode as you get closer to CWK.
Next, go to Nav 1 to dial in the Localizer course, 175 degrees, and then Nav 2, where you'll dial in R-268 to identify where DOFFS (the IAF) is on the approach course relative to DDTOO (the FAF).
Using the Five T's
Once you have completed the steps above you are ready to move on to the venerable five T's.
Time, turn, twist, throttle, and talk all have valid uses throughout many phases of instrument flight. We will focus primarily on the approach phase, but you can use the five T's to fly departure procedures and help you stay situationally aware en route. You should use these tools every time you cross a fix, whether it's defined by NAVAIDs, GPS, DME, or radial intersections.
Let's back up a few miles to see how you would use them early in the scenario. You departed KCLL and were vectored to join V565 to CWK (Centex Vortac), which is just northeast of Austin. Your first two fixes are OSUME and KABBA, and you identified CLL and IDU (Industry Vortac) once aloft.
OSUME is defined by 15 DME from CLL, and KABBA is co-defined by 21 DME and using R-331 off of IDU in Nav 2. The next fix is SCOLL, which is co-defined by 17 DME from CWK and the R-303 radial off of IDU, again using Nav 2.
Crossing OSUME
You will get your first opportunity to put the five T's into action.
- Do you need to call out or note your time?
No. - Do you need to turn to change heading?
No (unless vectored by ATC). - Do you need to twist or change your course?
No, because for Nav 1, you're still less than 30 nm west of CLL (your COP and your total distance to CWK is 59 nm). No for Nav 2 as well, because you preset KABBA using R-331 from IDU before departure. - Do you need to change your throttle?
No, because you are not changing altitude. - Do you need to talk?
No, because you are not crossing a fix that requires notifying ATC.
Crossing KABBA
You should be able to speed up your processing of the five T's.
- Time?
No. - Turn?
No. - Twist?
Yes. Switch Nav 1 to CWK, ID, twist your inbound course to R-250, and twist R-303 from IDU in Nav 2 to co-identify upcoming SCOLL. - Throttle?
No. - Talk.
No.
Crossing SCOLL
You are approximately 30 nm straight line distance to KAUS and would complete the five A's and load the ILS RWY 18L into your GPS. You also would switch Nav 1 mode from GPS to VLOC.
Crossing CWK
- Time?
No. - Turn?
Yes (as directed by ATC). - Twist?
Yes. Dial in 175 (inbound course) in VOR 1 and dial in SCALI (R-268 off of CWK) in VOR 2. - Throttle?
Yes, to descend. - Talk?
No.
Crossing SCALI
- Time?
No. - Turn?
No. - Twist?
Yes. Dial in RRTOO (R-233 off of CWK). - Throttle?
No. You are on a steady descent already. - Talk?
No.
Crossing RRTOO
- Time?
No. - Turn?
No. - Twist?
Yes. Dial in DDTOO (R-217 off of CWK). - Throttle?
No. You are still on a steady descent. - Talk?
No.
Crossing DDTOO
- Time?
Yes — to back yourself up if the glideslope goes out and you have to switch to using LOC RWY 18L. - Turn.
No.
- Twist?
Yes. Put R-88 off of CWK as a backup in Nav 2 for when you go missed and hold at HOOKK. We'll get to that specific task in just a second. - Throttle?
No. You are still on a steady descent. - Talk?
Yes. You will be handed off to KAUS Tower on 121.00.
Crossing the MAP
For this exercise, let's assume you have to go missed due to a low ceiling.
- Time?
Yes. Stop your clock. - Turn?
No, not until 3000' to 040 degrees unless otherwise directed by ATC. - Twist?
Yes, because you'll likely switch back to GPS mode and tell it to do Direct HOOKK. - Throttle?
Yes — full power to begin your climb. - Talk?
Yes. Declare going missed.
From here, you won't use the five T's again until you arrive at the hold. Austin Tower will hand you off to Departure, and they will ask what you want to do. They will either vector you back around or send you to HOOKK, 17 DME east of CWK on R-088. You might prefer the latter to let the ceiling hopefully come up or to redial your NAVAIDs without feeling too rushed. You have plenty of fuel, so the hold will allow you to collect your thoughts.
Depending on how you get vectored, you may arrive on CWK R-088 prior to HOOKK and have to do a parallel entry, or you may be vectored Direct to HOOKK and do a teardrop entry. For this scenario, let's assume it's Direct HOOKK.
Crossing HOOKK
Just before crossing HOOKK, switch back to VLOC mode and resume the five T's.
- Time?
Yes. Note it for the outbound leg of your teardrop entry (one minute). - Turn?
Yes — to 058 degrees (30 degrees into the protected area). - Twist?
Yes, R-268 inbound in Nav 1 for CWK and twist your heading bug to 058 degrees. - Throttle?
No (assuming you're in a small plane doing under 200 kts). - Talk?
Yes. Announce your entrance to the hold, time, and altitude. Prior to arriving at HOOKK, you would have received your holding instructions and would have asked for EFC (expect further clearance) should you experience lost comms.
One minute after crossing HOOKK outbound, you should use the five T's even though you aren't crossing another fix.
- Time?
Yes. Stop your clock. - Turn?
Yes, inbound to heading 268 degrees to intercept your inbound course. - Twist?
No. You already put R-268 in when you crossed HOOKK, and you'll keep your heading bug on 058 degrees. - Throttle?
No. - Talk?
No.
Once established inbound on heading 268 degrees, run the five T's again.
- Time?
Yes. - Turn?
No. - Twist?
No. - Throttle.
No. - Talk?
No.
Run them again when you cross HOOKK for the first time inbound.
- Time?
Yes. Stop your clock. - Turn?
Yes, outbound to heading 088 degrees. - Twist?
No. - Throttle?
No. - Talk
No.
At station passage, you'll want to consider the five T's at least one more time.
- Time?
Yes. - Turn?
No. - Twist?
No. - Throttle?
No. - Talk?
No.
Depending on the winds, you'll do the five T's again when you reach your desired time leg outbound, turning inbound, and completing the turn inbound back to HOOKK.
Whew, that was some work!
Our modern-day GPS and glass cockpit setups do a lot of work for us, so you do not need perform everything listed here. However, in a steam gauge plane, the five A's and T's are invaluable tools for maintaining situational awareness and managing your workload.
With diligent and regular practice, you will be able to emulate Hamlet when he said, "Speak the speech, I pray you, as I pronounced it, trippingly on the tongue..."
While Hamlet was never a pilot, he would be impressed by how efficiently you used one of your best single-pilot cockpit resources (yourself) to keep your aircraft under control and the outcome of your flight never in doubt.
Share this
You May Also Like
These Related Articles

3 IFR Holds To Perfect in a Flight Simulator

10 Essential IFR Cross-country Flight Planning Tips

